Multicloud data with Debezium - Part 2: Data source in AWS
By Leonardo Murillo
- 10 minutes read - 2044 wordsWelcome to Part 2 of this 3-part series on Multicloud Data with Debezium - in this post we will be building the source of our data, and will be implementing Debezium for tracking and streaming data changes in AWS.
For those that just got here and need a refresher on the scenario that we’re using for our experiment, or if you need to know which tools you’ll need installed to deploy this solution, take a look at part 1 of this series.
Before we do anything, the same disclaimer you will see across all three parts: this experiment is not production ready, do not go about and try to implement this as is in a production setting unless you’re looking for a dramatic way to find a new job.
Prerequisites and Codebase
To deploy this experiment yourself, you will need the following:
- An AWS account, with an active billing method (MSK is not available in AWS Free Tier)
- Terraform
- A SSH key for the bastion host
You can find the full codebase in the following repository:
github.com/murillodigital
Architecture

Resource Walkthrough
We will be working on a single AWS region, creating two private subnets and two public subnets.
A two node Managed Streaming For Kafka (MSK) cluster will be deployed, each node in a separate AZ. A single RDS instance and a Bastion host will be created in a single AZ all within the same VPC. The bastion host will be used both for bootstrapping the Database and registering the Debezium Connector as well as to be able to work against the database.
The bastion host is required since, as I’ll explain below, neither the database nor the Kafka cluster are available over the public internet, as they are deployed to private subnets and are also protected by a security group which allows connections only from services that share the same SG.
Debezium will be running as a container inside an Elastic Container Service cluster, which will be using Fargate for capacity - this is ideal as we will not have to manage any sort of autoscaling or instance registration against the cluster. A single service definition will spin up a single task, logs will be shipped over to CloudWatch logs and, in order for us to reach the task on a friendly name, an Application Load Balancer will target the task and send traffic to it.
In terms of security, although this is not quite ready for production, we are taking some measures to provide a basic level of protection. Two security groups will be created: one external which will allow access via SSH to the Bastion host as well as allow connections from anywhere to the application load balancer on port 80 and one internal that enables all services inside AWS to communicate with one another, but not to be reached from anything public.
Getting set up
Clone the repository
All the code you need to deploy this solution can be found at github.com/murillodigital/experiments inside a directory named multicloud_data_with_debezium, in there you will find a subdirectory for every cloud we will be working on, today we’re going to be looking into the aws folder.
$ git clone git@github.com:murillodigital/experiments
Cloning into 'experiments'...
remote: Enumerating objects: 54, done.
remote: Counting objects: 100% (54/54), done.
remote: Compressing objects: 100% (35/35), done.
remote: Total 54 (delta 15), reused 46 (delta 10), pack-reused 0
Receiving objects: 100% (54/54), 11.61 KiB | 11.61 MiB/s, done.
Resolving deltas: 100% (15/15), done.
$ cd experiments/multicloud_data_with_debezium/aws/terraform/
$ ls
bastion.tf	ecs.tf		msk.tf		outputs.tf	variables.tf
database.tf	main.tf		network.tf	templates
Setup Terraform to use your AWS account
My preferred method for enabling Terraform to authenticate against AWS is creating an Access Key and making it available to Terraform as an environment variable. Amazon has very good documentation on their website, here you can see how to create the necessary tokens. Once you’re done with that, you will have two pieces of information, an Access Key ID and a Secret Access Key. On the terminal where you will be running terraform, use those to export the following variables:
$ export AWS_ACCESS_KEY_ID=yourAccessKeyId
$ export AWS_SECRET_ACCESS_KEY=yourSecretAccessKey
$ export AWS_DEFAULT_REGION=us-east-1
As you can see you can also define a default region, by exporting the variable AWS_DEFAULT_REGION.
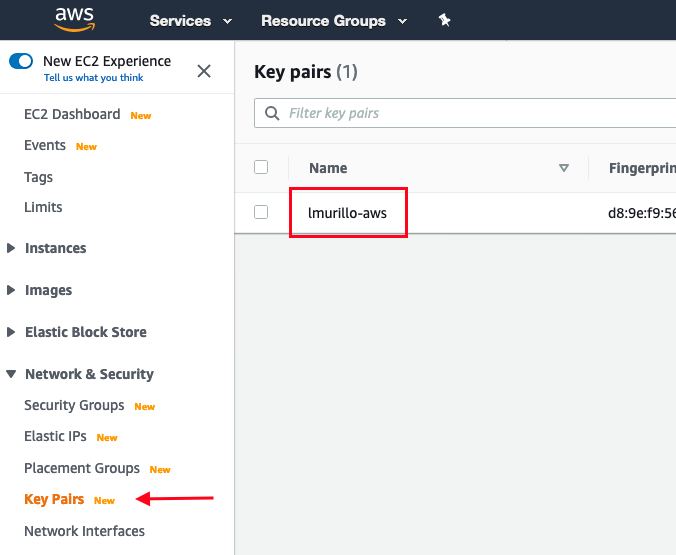
Create an SSH key for the bastion host
Follow these instructions to create a keypair for our bastion host, you don’t have to do this if you already have a keypair in AWS you want to use, all we will need is the key pair name.
Let’s look into the terraform code
The full set of resources required for our data source in AWS are available inside the aws/terraform directory, we will be using this as a module inside the main.tf file in the root of multicloud_data_with_debezium directory. The templates/ sub directory contains three files, two of them will be placed in the bastion host (dbase initializer and Debezium connector registration), and the third will be used to register the task definition in ECS.
-rw-r--r--  1 leonardomurillo  staff   2099 Jul 16 13:52 bastion.tf
-rw-r--r--  1 leonardomurillo  staff   1113 Jul 16 06:12 database.tf
-rw-r--r--  1 leonardomurillo  staff   2665 Jul 16 06:28 ecs.tf
-rw-r--r--  1 leonardomurillo  staff   1330 Jul 16 05:26 msk.tf
-rw-r--r--  1 leonardomurillo  staff   1340 Jul 16 06:53 network.tf
-rw-r--r--  1 leonardomurillo  staff    702 Jul 16 05:50 outputs.tf
drwxr-xr-x  5 leonardomurillo  staff    160 Jul 15 05:56 templates
-rw-r--r--  1 leonardomurillo  staff    255 Jul 16 05:43 variables.tf
We are not going to go over every line of code, I encourage you to clone the repo and check out the code. Comment in the article if you have any questions.
Let’s do a quick review of each of the files:
network.tf
We will deploy all fundamental resources required in terms of network to be have both public and private subnets in a single region. In part 3 we will also build on top of these resources to establish a VPN connection between our AWS VPC and the GCP VPC we will be creating.
Once VPC with a total of four subnets, two public and two private, one routing table for the public subnets and another one for the private ones, internet gateway, nat gateway, a public and private security group, and all the necessary security group rules and routing table routes are created here.
When using terraform, it is usually a good decision to create individual resources for security group rules and routing table routes, and not put them as properties of their parent resource alone. This is particularly important in our scenario where the VPN (and rules and routes associated to it) will be created later in a separate terraform module and requires orchestration between multiple clouds.
msk.tf
Here we define the necessary resources to spin up our Managed Kafka architecture. There are a couple of important details to pay attention to in the configuration we are creating.
MSK Configurations cannot be deleted, this is a limitation by AWS. To go around that problem, we’re adding a random string to the configuration name every time we create it. There’s a downside to this, you will end up with lots of configurations over time if you apply/destroy as you iterate on testing, but if you don’t do this, terraform will fail due to a resource name collision after you destroy and create a second time.
resource "aws_msk_configuration" "debezium_msk_configuration" {
  kafka_versions = ["2.4.1"]
  name           = "debezium${random_string.unique_configuration_identifier.result}"

  server_properties = <<PROPERTIES
min.insync.replicas = 1
default.replication.factor = 1
auto.create.topics.enable = true
delete.topic.enable = true
PROPERTIES
}
The default MSK configuration will not work with Debezium. Auto topic creation must be enabled for Debezium to dynamically generate topics based on the schema of the database. Two additional options need to be configured to avoid a NOT_ENOUGH_REPLICAS error, the number of in sync replicas, and the replication factor for each message.
database.tf
Our RDS instance. The most important aspect to point out is here is, you need to make sure your PostgreSQL RDS is configured with the rds.logical_replication parameter set to 1 for Debezium to work correctly.
resource "aws_db_parameter_group" "debezium_db_parameter_group" {
  name = "murillodigitaldebeziumdbparams"
  family = "postgres12"

  parameter {
    name = "rds.logical_replication"
    value = "1"
    apply_method = "pending-reboot"
  }
}
ecs.tf
Our Elastic Container Service resources live in this file. This is the more complex piece of the architecture, since it contains the cluster, service, task, application load balancer, log group and IAM related resources. Let’s highlight a few important details related to Fargate.
Since we are using Fargate as compute capacity provider, you need to make sure your cluster can assume the necessary rights to communicate with AWS’s API. AWS has a “built in” policy that has a generic set of grants required by ECS called AmazonECSTaskExecutionRolePolicy:
resource "aws_iam_role" "debezium_fargate_iam_role" {
  name               = "murillodigital-debezium-fargate-iam-role"
  assume_role_policy = data.aws_iam_policy_document.debezium_fargate_iam_policy.json
}

data "aws_iam_policy_document" "debezium_fargate_iam_policy" {
  statement {
    actions = ["sts:AssumeRole"]

    principals {
      type        = "Service"
      identifiers = ["ecs-tasks.amazonaws.com"]
    }
  }
}

resource "aws_iam_role_policy_attachment" "debezium_fargate_iam_policy_attachment" {
  role       = aws_iam_role.debezium_fargate_iam_role.id
  policy_arn = "arn:aws:iam::aws:policy/service-role/AmazonECSTaskExecutionRolePolicy"
}
Another important detail about Fargate is, you must use the awsvpc network mode, which you must specify in your task definition resource and template:
[
  {
    "name": "debezium",
    "image": "debezium/connect:1.2",
    "cpu": 512,
    "memory": 2048,
    "essential": true,
    "networkMode": "awsvpc",
...
resource "aws_ecs_task_definition" "debezium_task" {
  family = "murillodigital-debezium-task-definitiojn"
  network_mode = "awsvpc"
  requires_compatibilities = ["FARGATE"]
  cpu = 512
  memory = 2048
  tags = {}
  execution_role_arn = aws_iam_role.debezium_fargate_iam_role.arn
  container_definitions = templatefile("./templates/task_definition.json.tpl", { bootstrap_servers = aws_msk_cluster.debezium_msk_cluster.bootstrap_brokers })
}
Debezium requires a good amount of memory to function. Anything below 2GB always ended up in the container killed because “out of memory”
bastion.tf
Both RDS and Kafka can only be reached from inside the VPC, the bastion host serves a dual purpose. On the one hand it allows you to interact with the resources inside the VPC by SSHing into it, and on the other, we will use it to bootstrap some initial config in both RDS as well as MSK. Pay attention to the User Data passed to the instance:
...

  user_data = <<EOF
#!/bin/bash
echo '${replace(data.template_file.connector_initializer.rendered, "\n", " ")}' > /tmp/connector.json
echo '${replace(data.template_file.debezium_sql_initializer.rendered, "\n", " ")}' > /tmp/initializer.sql
sudo apt update
sudo apt install -y wget
wget --quiet -O - https://www.postgresql.org/media/keys/ACCC4CF8.asc | sudo apt-key add -
echo "deb http://apt.postgresql.org/pub/repos/apt/ bionic-pgdg main" | sudo tee /etc/apt/sources.list.d/pgdg.list
sudo apt update
sudo apt -y install postgresql-client-12
sleep 120
PGPASSWORD="${var.db_password}" psql -h ${aws_db_instance.debezium_db.address} -p 5432 -U "${var.db_username}" -d ${var.db_name} -f "/tmp/initializer.sql"
curl -i -X POST -H "Accept:application/json" -H "Content-Type:application/json" ${aws_lb.debezium_lb.dns_name}/connectors/ --data "@/tmp/connector.json"
EOF

  tags = {
    name = "murillodigital-debezium-bastion"
  }
}
We are placing the rendered template files in the machine and installing the psql client. Note there’s a two minute sleep in that script, this is not ideal, but it’s there to solve a timing problem: the last line in that script POSTs our debezium connector configuration to the debezium service, it may take some time for the debezium container to spin up, so we need to account for that. A better way to go about this would be to use the aws cli tools to check at an interval whether the task has started, and then trigger the curl call, but that was a bit more logic than I wanted to take time to introduce in this experiment.
Some other details
The username and password for the database are defined as variables in our variables.tf file and will default to username: murillodigital and password: notmyrealpwd. The name of the database we will be using to demonstrate our solution will be called inventory and you can see the very simple schema of the database by looking at the initialize.sql.tpl template.
Pay close attention to the connector configuration found in templates/psql-conector.json.tpl, for more information on the possible values for this configuration file you can see the documentation on the debezium website
AWS is ready! Now lets move over to the Google Cloud
We have looked over at the codebase that will deploy the AWS side of things, now move over to part 3 to see the GCP side of the platform and take it for a test drive.
Stay up to date with new experiments, join my mailing list!.