A first look at Waypoint by HashiCorp
By Leonardo Murillo
- 19 minutes read - 3979 wordsThe endless search for a simpler workflow
HashiCorp announced in this last 2020 HashiConf the release of a new open source project called Waypoint.
Waypoint’s value proposition is: to provide developers with a way to declare, in a single file, a build/deploy/release workflow that can work across any platform.
In this post I’ll walk you through the process of getting setup, and will share some of my findings and opinions as to how waypoint fits in the cloud native engineer’s toolchain.
Table of contents:
Installing Waypoint
To use waypoint you need both a client, and a server side component. The server is containerized so it’s quite simple to get it running on your docker or kubernetes environment by using the waypoint command line interface.
Installing the client side CLI
You start by installing the waypoint CLI. You can download precompiled binaries for various platforms, including Mac OS, Windows and Linux.
Hashi’s official deb and rpm repos have releases readily available for a good set of Linux distros.
For the purpose of this experiment, I tried the waypoint client out in two platforms, Ubuntu 20.04 and Windows 10.
We’ll go over the server installation later on, where I got to try both the docker install as well as the kubernetes deployment.
Client installation: Ubuntu 20.04
Getting the waypoint CLI installed in Ubuntu was pretty straight forward, using the official Hashicorp’s deb repository. Note that I followed the installation instructions verbatim with no surprises.
curl -fsSL https://apt.releases.hashicorp.com/gpg | sudo apt-key add -
sudo apt-add-repository "deb [arch=amd64] https://apt.releases.hashicorp.com $(lsb_release -cs) main"
sudo apt-get update && sudo apt-get install waypoint
The package will install the waypoint executable, a single 132MB binary, in /usr/bin. Of course, you will need to have sudo rights to go with this installation method.
It is also pretty simple to install the binary by hand, something particularly useful if not running as root. Just download or build the binary, put it somewhere in your PATH and you’re good to go.
Client installation: Windows 10
I don’t use a package manager for Windows, so I decided to install waypoint “by hand”, which is simple enough and can be done with a handful of PowerShell commands.
- Download the waypoint Windows binary from https://www.waypointproject.io/downloads, the latest version at the time of this writing is 0.1.5.
Invoke-WebRequest -Uri "https://releases.hashicorp.com/waypoint/0.1.5/waypoint_0.1.5_windows_amd64.zip" -OutFile $HOME\Downloads\waypoint.zip
- Create a directory somewhere in your PATH for
waypoint, I pickedC:\Program Files\waypoint- if you want to use that same path you will need to have Admin privileges on your Windows machine.
New-Item -Path "C:\Program Files" -Name "waypoint" -ItemType "directory"
- Extract the waypoint.zip file downloaded into the directory you created.
Expand-Archive -Path $HOME\Downloads\waypoint.zip -DestinationPath "C:\Program Files\waypoint"
Windows install note:
There is a scoop package available that handles automated install and uninstall. Considering I’m not a big fan of Windows package managers, and the fact that the scoop repository is not officially maintained by Hashicorp, I went with the manual install, however, scoop install instructions can be found here.
Client details
The waypoint client uses contexts to determine which waypoint server to connect to and uses an access token for authentication.
When your first install the CLI it will have no contexts defined, as it’s expected.
Once you use the automated server install command, together with the bootstrapping of the server you will get your first context created automatically, including configuring the initial authentication token. This does not happen if you do the server installation manually, in which case you will have to manually configure your initial context.
waypoint is clearly still in its infancy, and as repeatedly stated all over the documentation, it is not to be considered production ready.
From my perspective, some of the more critical aspects that make waypoint not yet production ready are the current security gaps.
In terms of security, there are still various fundamental requirements that have to be covered for most production use cases, including:
- There is no way to handle specific access controls, either you have access, or you don’t – there is no authorization implemented.
- Token are the only way to grant access.
- There is no way to revoke tokens nor have visibility into access history.
- There is no way to provide custom TLS certificates.
However, as I mentioned, Hashi is making it quite clear to try at your own risk. Point being, don’t get excited and use this in prod if you want to keep your job.
The waypoint server
You can run the waypoint server container both in a barebones docker daemon (or compatible alternatives) or inside kubernetes. If running on Docker you will need to pull the waypoint docker image from the public docker hub, when running on Kubernetes, the orchestrator will handle that for you.
docker pull hashicorp/waypoint:latest
Your choice for deployment can be defined by using the -platform argument of the waypoint install command, that is, if you do choose to use the install command.
You can also choose to install the server manually, which allows you to specify some custom configurations.
The install command handles the initial bootstrapping of the server, something that you will have to take care of yourself if you choose to go in the manual install direction, as well as handle the initial context configuration of your waypoint client to have it pointed at your recently bootstrapped server.
Automated installation
As I mentioned before, you use the waypoint CLI to handle both manual as well as automated installation scenarios, in the case of automated install by using the install command.
When calling the install command you will want to specify your chosen target for deployment, using the -platform argument, which accepts one of three available target systems: docker, kubernetes (the default) and nomad.
There is a handy little feature that you get as part of waypoint which is a URL service, which basically handles reverse proxying requests into your deployed services using an endpoint available on the public internet. This service is free of charge, but you must accept the terms of service during installation. To accept the TOS non-interactively just add the -accept-tos flag.
Be aware that there is no way to opt-out of using the URL service if you choose the automated install alternative, which means by default you will get a publicly facing URL for every build you run, which could be a security concern.
The free URL service runs using a couple of also open source applications made available by Hashi, so you could run your own if you wanted to, say for example, to have dynamically yet internal only unique URLs generated for your builds (details on the URL service can be found here).
I tried two platforms, docker and kubernetes, simply by running the following commands:
Installation on Docker
Automated installation of waypoint server in a local docker daemon is as simple as it gets. Just run the install command and you’ll end up with a container running with ports exposed and ready for you to use, together with your client configured with a context to talk to it.
$ waypoint install -platform=docker -accept-tos
  ✓ Installing Waypoint server to docker
  ✓ Server container started!
  ✓ Configuring server...
  Waypoint server successfully installed and configured!

  The CLI has been configured to connect to the server automatically. This
  connection information is saved in the CLI context named "install-1605523432".
  Use the "waypoint context" CLI to manage CLI contexts.

  The server has been configured to advertise the following address for
  entrypoint communications. This must be a reachable address for all your
  deployments. If this is incorrect, manually set it using the CLI command
  "waypoint server config-set".

  Advertise Address: waypoint-server:9701
  Web UI Address: https://localhost:9702
Running the command against your local docker daemon will get you a single container running, exposing ports 9701 and 9702, and a single docker volume where waypoint will store its database.
$ docker ps
CONTAINER ID        IMAGE                       COMMAND                  CREATED              STATUS              PORTS                              NAMES
ee2e2344c206        hashicorp/waypoint:latest   "/usr/bin/waypoint s…"   About a minute ago   Up About a minute   0.0.0.0:9701-9702->9701-9702/tcp   waypoint-server

$ docker volume ls
DRIVER              VOLUME NAME
local               waypoint-server
And it will automatically configure your waypoint cli context (including authorization token), to talk to that new waypoint server:
$ waypoint context list
    |        NAME        | SERVER ADDRESS
----+--------------------+-----------------
  * | install-1605523432 | localhost:9701
Kubernetes install
I’m using a local K3s kubernetes setup to try out the K8s version of the deployment. Waypoint will use whichever kubectl context you currently have enabled so be careful with that if you have multiple clusters configured whichever you want to deploy to is the one currently active.
The waypoint client will not create a namespace for you, so if you choose to install the server in a namespace other than default, you will have to create the namespace first.
Installing waypoint will create a StatefulSet and a Service for you. The LoadBalancer service will expose ports 9701 and 9702. Make note that, being a LoadBalancer service, running this on most public clouds will automatically make it available over the public internet.
I have some comments about the default Kubernetes install:
As I mentioned, you always get a LoadBalancer type service, even if using the
-advertise-internalcommand line flag. I find it counterintuitive to get a publicly facing endpoint if I want it to be available only internally, I might be misinterpreting the flag but still, doesn’t quite feel right.Some aspects of the generated manifests can be modified via command line flags, including adding annotations, changing the name of the
Service, image name and pull secret. If you want to change anything else, you’ll have to have it-show-yamland modify and apply manually - problem with that is, you will not get the automated install going which includes bootstrapping and context configuration.
$ kubectl create ns waypoint
$ waypoint install -platform=kubernetes -namespace=waypoint -accept-tos
✓ Creating Kubernetes resources...
 │ service/waypoint created
 │ statefulset.apps/waypoint-server created
✓ Kubernetes StatefulSet reporting ready
✓ Waiting for Kubernetes service to become ready..
✓ Configuring server...
Waypoint server successfully installed and configured!

The CLI has been configured to connect to the server automatically. This
connection information is saved in the CLI context named "install-1605556222".
Use the "waypoint context" CLI to manage CLI contexts.

The server has been configured to advertise the following address for
entrypoint communications. This must be a reachable address for all your
deployments. If this is incorrect, manually set it using the CLI command
"waypoint server config-set".

Advertise Address: 10.0.10.22:9701
Web UI Address: https://10.0.10.22:9702
Here’s the output of the waypoint kubernetes install:
$ kubectl get all --namespace waypoint
NAME                       READY   STATUS    RESTARTS   AGE
pod/waypoint-server-0      1/1     Running   0          2m26s

NAME               TYPE           CLUSTER-IP      EXTERNAL-IP   PORT(S)                        AGE
service/waypoint   LoadBalancer   10.43.209.131   10.0.10.22    9701:31880/TCP,9702:30767/TCP   2m26s

NAME                               READY   AGE
statefulset.apps/waypoint-server   1/1     2m26s

$ kubectl get pv -n waypoint
NAME                                       CAPACITY   ACCESS MODES   RECLAIM POLICY  STATUS   CLAIM                             STORAGECLASS   REASON   AGE
pvc-022590b8-8682-44da-8509-41165a0af181   1Gi        RWO            Delete          Bound    waypoint/data-waypoint-server-0   local-path              14m

$ kubectl get pvc -n waypoint
NAME                     STATUS   VOLUME                                     CAPACITY   ACCESS MODES   STORAGECLASS   AGE
data-waypoint-server-0   Bound    pvc-022590b8-8682-44da-8509-41165a0af181   1Gi       RWO            local-path     15m
Waypoint uninstall caveats
There is no automated way to uninstall the waypoint server. I ran into this with both platforms I tried out.
Docker uninstall
As I wrote this post, I wanted to start over my docker install to properly document the process, and that’s when I realized I had to manually remove the container and its volume to be able to start from scratch, be careful that by doing so, you will wipe out anything in your DB.
$ docker stop waypoint-server
$ docker rm waypoint-server
$ docker volume rm waypoint-server
$ waypoint context delete {enter your unique install context name here}
Kubernetes uninstall
The same went for the kubernetes install, since when I first ran it, I did not specify a namespace and it installed in the default namespace by, well, default. Uninstalling the kubernetes deployment is easier thanks to the -show-yaml output of the waypoint install command which shows you the manifests that it will apply to the cluster, so you can just delete them by passing them to kubectl.
waypoint install -platform=kubernetes -accept-tos -show-yaml | kubectl delete -f -
Working with the server
The Web UI
After doing your client and server installation, the web interface will be available on port 9702. To see what IP or URL the LoadBalancer service is bound to, have a look at the object:
$ kubectl get service/waypoint -n waypoint
NAME       TYPE           CLUSTER-IP      EXTERNAL-IP   PORT(S)                        AGE
waypoint   LoadBalancer   10.43.209.131   10.0.10.22    9701:31880/TCP,9702:30767/TCP   25m
In my case, you can see how the external IP of the service is 10.0.10.22, this will be different in your case, and you may see a LoadBalancer URL or some form of elastic IP associated to the service, depending on the environment where your kubernetes cluster is running.
Going to https://{external-ip}:9702/ will take you to the web interface of the waypoint server.
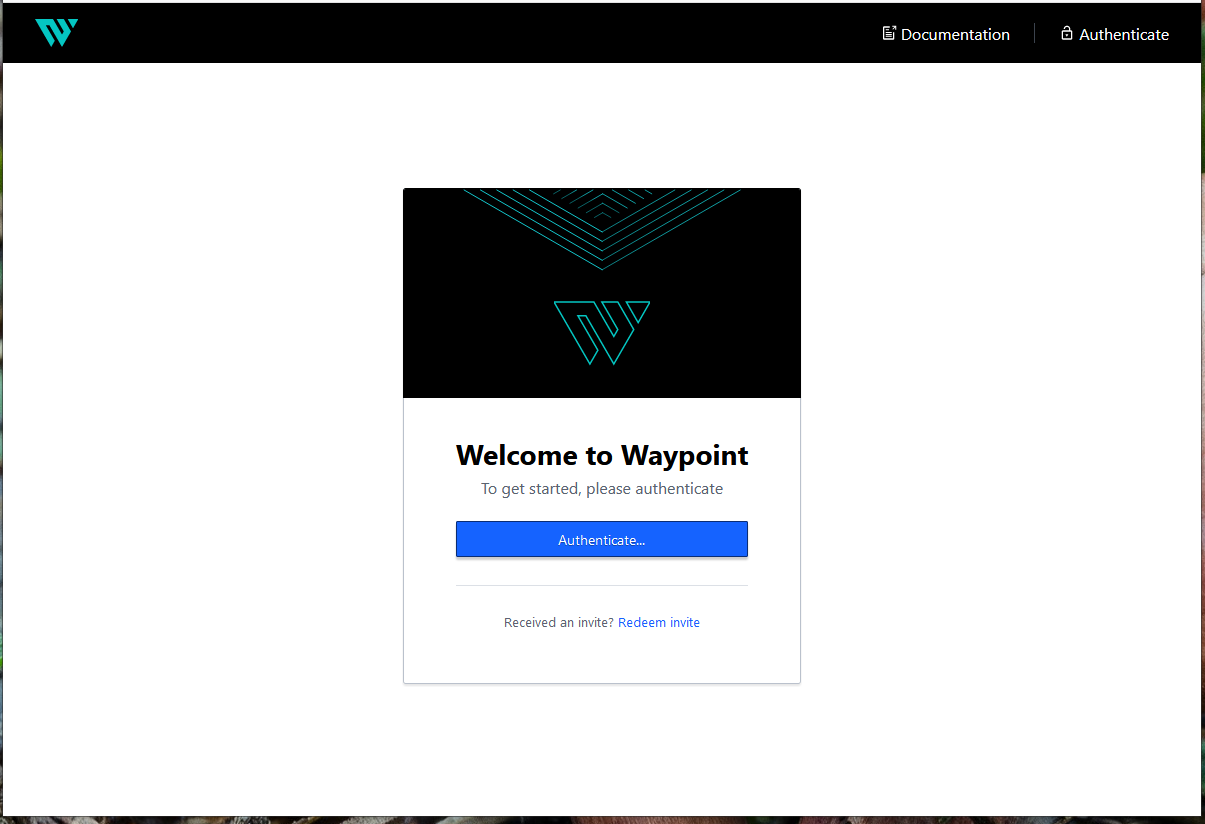
Generate a token
You can both generate an actual token for login, or generate an invite token, which a user can use in exchange for an actual access token. Both actions can be completed using the waypoint CLI:
$ waypoint token new
bM152PWkXx....pHk4VPmG1DGMhC

$ waypoint token invite
4sjxJnSh32....bJr2ae8JhSiL6e
You have to be careful with these tokens, there is no way to invalidate them! Once generated and handed out, you can’t kick anybody out. Remember, waypoint is not production ready.
Running our first project
For sake of simplicity, I decided to use the sample applications made available in hashi’s examples repo. I’m going to be running the nodejs/kubernetes sample from my Linux install, and will try the Windows setup to deploy the python/docker sample.
Kubernetes deployment sample on Ubuntu
First you need to clone the examples repository and go into /kubernetes/nodejs. Let’s have a look at the waypoint.hcl file:
project = "example-nodejs"

app "example-nodejs" {
  labels = {
      "service" = "example-nodejs",
      "env" = "dev"
  }

  build {
    use "pack" {}
    registry {
        use "docker" {
          image = "example-nodejs"
          tag = "1"
          local = true
        }
    }
 }

  deploy {
    use "kubernetes" {
    probe_path = "/"
    }
  }

  release {
    use "kubernetes" {
    }
  }
}
The waypoint.hcl file defines the workflows and configurations of one or more apps inside a waypoint project. There can only be one waypoint.hcl file per project, but multiple apps inside the project can exist.
When using multiple application as part of a single waypoint project, it’s expected that each application lives in its own subdirectory below the root where waypoint.hcl is located.
At least one app and one project parameter are required at the top-level of the waypoint.hcl file. Inside each app you should have three stanzas, one for each step of the workflow: build, deploy and release.
I’m not going to go into the details as to what each stanza and parameter means, and how you can use them inside a waypoint.hcl. The documentation is satisfactory so here’s references to where you can get pretty solid information as to what you can and can’t do inside a waypoint.hcl file:
The waypoint init command connects to the waypoint server and initializes the project, using the project name specified in the waypoint.hcl file. Using the sample file above, we get the following results when running waypoint init:
/waypoint-examples/kubernetes/nodejs$ waypoint init
✓ Configuration file appears valid
✓ Connection to Waypoint server was successful
✓ Project "example-nodejs" and all apps are registered with the server.
✓ Plugins loaded and configured successfully
✓ Authentication requirements appear satisfied.

Project initialized!

You may now call 'waypoint up' to deploy your project or
commands such as 'waypoint build' to perform steps individually.
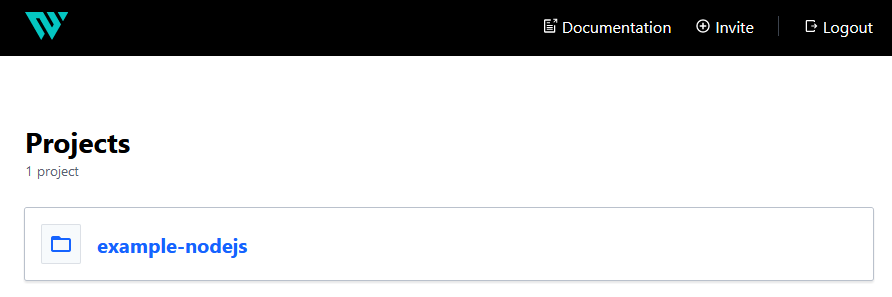
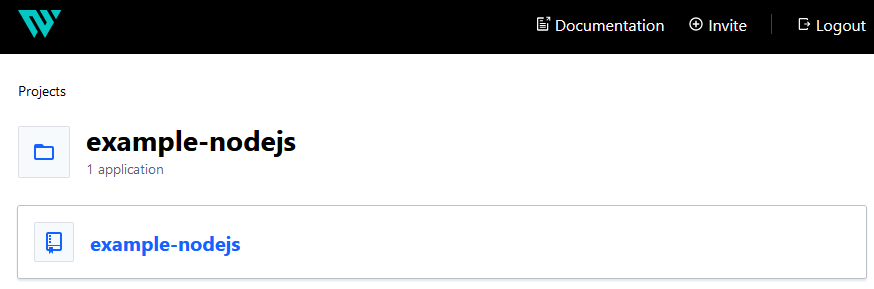
And if you take a look at the Web UI, you’ll see the project created and inside that project, one single application, both named as per the configuration specified in the waypoint.hcl file:
The next step is to run waypoint up which runs the full workflow, meaning it will run the three steps: build, deploys and release.
/waypoint-examples/kubernetes/nodejs$ waypoint up

» Building...
Creating new buildpack-based image using builder: heroku/buildpacks:18
✓ Creating pack client
✓ Building image
 │ [exporter] Adding 1/1 app layer(s)
 │ [exporter] Reusing layer 'launcher'
 │ [exporter] Adding layer 'config'
 │ [exporter] Adding label 'io.buildpacks.lifecycle.metadata'
 │ [exporter] Adding label 'io.buildpacks.build.metadata'
 │ [exporter] Adding label 'io.buildpacks.project.metadata'
 │ [exporter] *** Images (1e183fad21d9):
 │ [exporter]       index.docker.io/library/example-nodejs:latest
 │ [exporter] Adding cache layer 'heroku/nodejs-engine:nodejs'
 │ [exporter] Reusing cache layer 'heroku/nodejs-engine:toolbox'
✓ Injecting entrypoint binary to image

Generated new Docker image: example-nodejs:latest
✓ Tagging Docker image: example-nodejs:latest => example-nodejs:1

» Deploying...
✓ Kubernetes client connected to https://127.0.0.1:6443 with namespace default
✓ Creating deployment...
✓ Deployment successfully rolled out!

» Releasing...
✓ Kubernetes client connected to https://127.0.0.1:6443 with namespace default
✓ Creating service...
⠙ Service is ready!

The deploy was successful! A Waypoint deployment URL is shown below. This
can be used internally to check your deployment and is not meant for external
traffic. You can manage this hostname using "waypoint hostname."

   Release URL: http://10.43.221.203:80
Deployment URL: https://surely-choice-goldfish--v1.waypoint.run
As you can tell from the waypoint.hcl file shown above, we’re bulding using pack (which is actually buildpack), and we’re going to publish the built artifact to the local docker daemon with 1 for tag:
REPOSITORY                                          TAG                                                                IMAGE ID            CREATED             SIZE
example-nodejs                                      1                                                                  5d69e8dd71a6        57 minutes ago      667MB
example-nodejs                                      latest                                                             5d69e8dd71a6        57 minutes ago      667MB
This behavior can be modified to publish to some remote registry as well, have a look at the documentation links I posted above.
Also pay attention to the fact that, since we’re using kubernetes for both deploy and release steps, waypoint handled the creation of a Deployment object during deploy, and then exposed that deploment by creating a Service object during release.
And finally, remember we talked about the URL service, have a look at the deployment URL automatically generated. This is a public facing URL that will proxy traffic over to your deployment, for instance, I can go to that URL and, as much as I’m running my service in my local K3s cluster without any incoming exposure on the public internet, I can get to my service:

This is super convenient but can also be dangerous so be mindful of the fact whatever you release, can be accesed from anywhere.
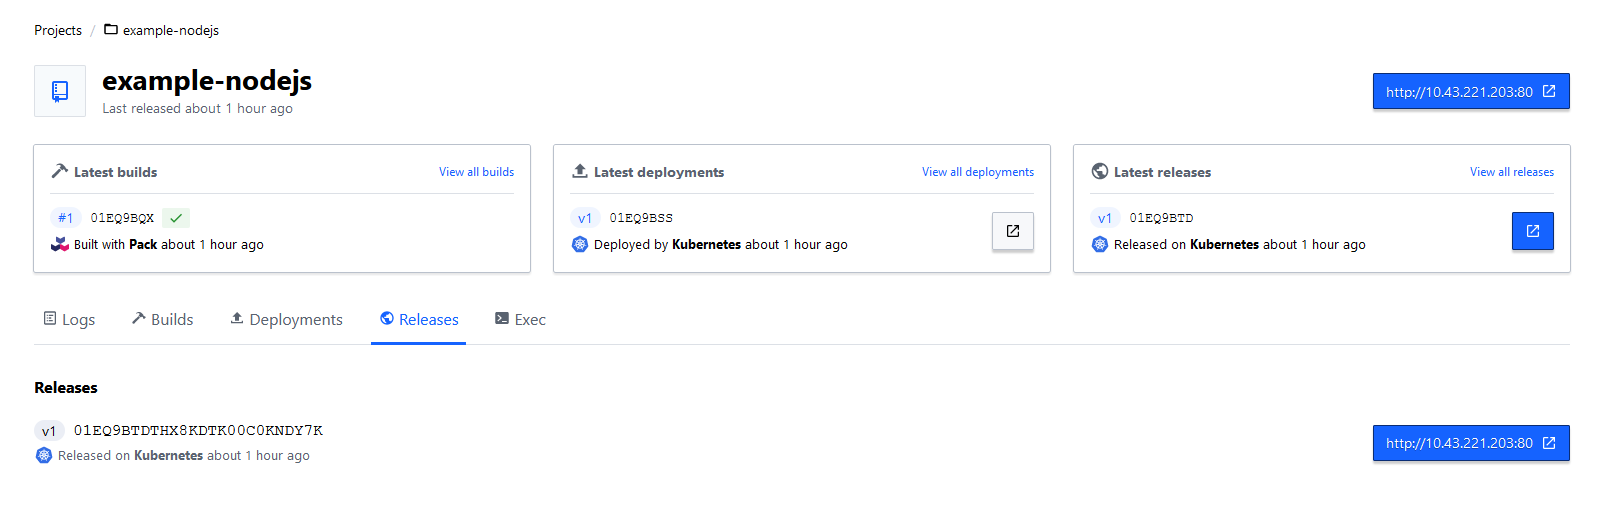
Once you’ve done your first kubernetes release, here’s what you will find in the waypoint web UI:
And these are the objects created for you inside the kubernetes cluster automatically as part of the waypoint workflow:
/kubernetes/nodejs$ kubectl get all
NAME                                                             READY   STATUS    RESTARTS   AGE
pod/example-nodejs-01eq9bsy6g24b4rz8mj3fyv96r-7cd9c8d67c-n6tjt   1/1     Running   0          63m

NAME                     TYPE        CLUSTER-IP      EXTERNAL-IP   PORT(S)   AGE
service/example-nodejs   ClusterIP   10.43.221.203   <none>        80/TCP    63m

NAME                                                        READY   UP-TO-DATE   AVAILABLE   AGE
deployment.apps/example-nodejs-01eq9bsy6g24b4rz8mj3fyv96r   1/1     1            1           63m

NAME                                                                   DESIRED   CURRENT   READY   AGE
replicaset.apps/example-nodejs-01eq9bsy6g24b4rz8mj3fyv96r-7cd9c8d67c   1         1         1       63m
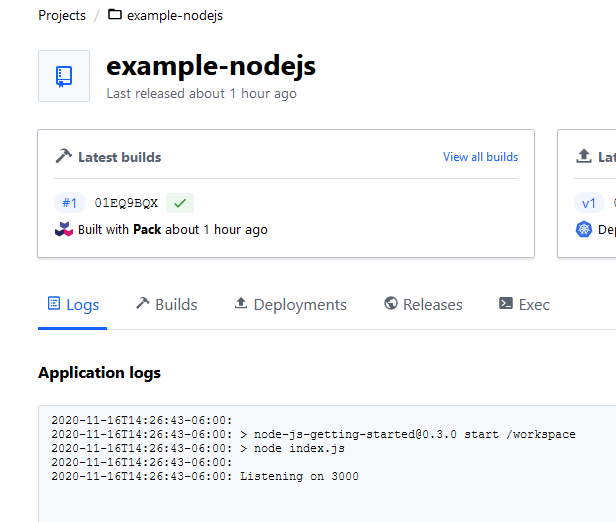
Both waypoint CLI as well as Web UI give you some very cool features, such as inspecting the logs of your running deployments:
Or execute a command inside the running release:
kubernetes/nodejs$ waypoint exec /bin/bash
Connected to deployment v1
heroku@example-nodejs-01eq9bsy6g24b4rz8mj3fyv96r-7cd9c8d67c-n6tjt:/$ whoami
heroku
heroku@example-nodejs-01eq9bsy6g24b4rz8mj3fyv96r-7cd9c8d67c-n6tjt:/$ exit
exit
Every build, deployment and release will be uniquely identified automatically by waypoint. I did not find a way to specify my own versioning function.
Docker deployment sample on Windows
A lot of the steps and what you will find in the UI will be the same regardless of what you used to build, deploy and release. So I will just focus on validating how waypoint performs on Windows, using a local Docker Desktop and using PowerShell for shell.
We are going to use the docker/python example in the examples repository. Let’s have a look at the waypoint.hcl file:
project = "example-python"

app "example-python" {
  labels = {
    "service" = "example-python",
    "env" = "dev"
  }

  build {
    use "docker" {}
  }

  deploy {
    use "docker" {
        service_port = 8080
    }
  }
}
I followed the windows client installation instructions so, having waypoint in my path, I deployed the waypoint server to my local docker daemon, using the same instructions for installation on docker:
PS C:\Users\Leonardo Murillo\Documents\development\waypoint-examples\docker\python> docker pull hashicorp/waypoint:latest
latest: Pulling from hashicorp/waypoint
188c0c94c7c5: Pull complete                                                                                                                                              94bc8770a91f: Pull complete                                                                                                                                              d3a371e9d148: Pull complete                                                                                                                                              Digest: sha256:428213e632ab9990e26c2fc437e43d3bf1c2cdcd5332ecd3ec2f372ab6add3ba
Status: Downloaded newer image for hashicorp/waypoint:latest
docker.io/hashicorp/waypoint:latest
PS C:\Users\Leonardo Murillo\Documents\development\waypoint-examples\docker\python> waypoint install -platform=docker -accept-tos
 + Installing Waypoint server to docker
 + Server container started!
 + Configuring server...
Waypoint server successfully installed and configured!

The CLI has been configured to connect to the server automatically. This
connection information is saved in the CLI context named "install-1605564944".
Use the "waypoint context" CLI to manage CLI contexts.

The server has been configured to advertise the following address for
entrypoint communications. This must be a reachable address for all your
deployments. If this is incorrect, manually set it using the CLI command
"waypoint server config-set".

Advertise Address: waypoint-server:9701
Web UI Address: https://localhost:9702
PS C:\Users\Leonardo Murillo\Documents\development\waypoint-examples\docker\python> docker ps
CONTAINER ID        IMAGE                       COMMAND                  CREATED             STATUS              PORTS                              NAMES
3ebd6f243135        hashicorp/waypoint:latest   "/usr/bin/waypoint s…"   10 seconds ago      Up 9 seconds        0.0.0.0:9701-9702->9701-9702/tcp   waypoint-server
Once installed, I’m going to run waypoint init followed by waypoint up to get the python example built using docker and deployed to my local docker desktop:
PS C:\Users\Leonardo Murillo\Documents\development\waypoint-examples\docker\python> waypoint init
 + Configuration file appears valid
 + Connection to Waypoint server was successful
 + Project "example-python" and all apps are registered with the server.
 + Plugins loaded and configured successfully
 + Authentication requirements appear satisfied.

Project initialized!

You may now call 'waypoint up' to deploy your project or
commands such as 'waypoint build' to perform steps individually.
PS C:\Users\Leonardo Murillo\Documents\development\waypoint-examples\docker\python> waypoint up

» Building...
 + Initializing Docker client...
 + Building image...
 │ Step 9/10 : EXPOSE 8080
 │  ---> Running in 8a190b9beff3
 │ Removing intermediate container 8a190b9beff3
 │  ---> fa3a1ce317eb
 │ Step 10/10 : CMD ["gunicorn", "-b", "0.0.0.0:8080", "wsgi", "-k", "gevent"]
 │  ---> Running in d3cf9b33a3d9
 │ Removing intermediate container d3cf9b33a3d9
 │  ---> 5444049feb05
 │ Successfully built 5444049feb05
 │ Successfully tagged waypoint.local/example-python:latest
 + Injecting Waypoint Entrypoint...

» Deploying...
 + Setting up waypoint network
 + Starting container
 + App deployed as container: example-python-01EQ9JFF61600YX7V411AX1CE6

» Releasing...

The deploy was successful! A Waypoint deployment URL is shown below. This
can be used internally to check your deployment and is not meant for external
traffic. You can manage this hostname using "waypoint hostname."

           URL: https://mainly-intent-bee.waypoint.run
Deployment URL: https://mainly-intent-bee--v1.waypoint.run
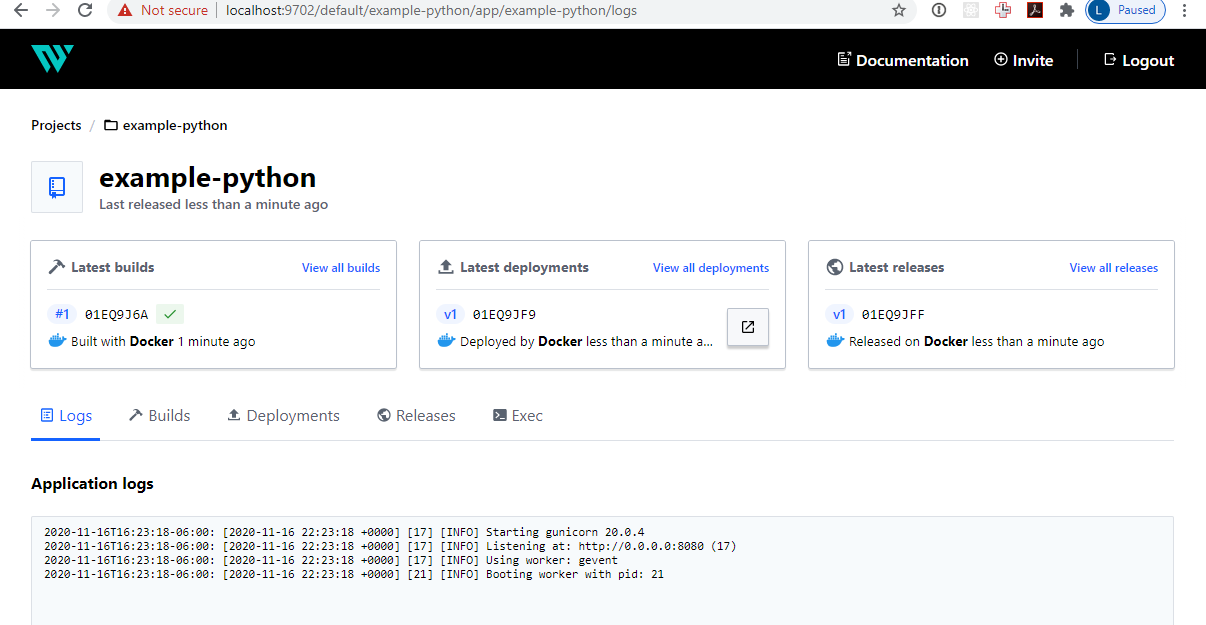
After the build, deploy, release workflow is complete, the project and application show successfully in the Waypoint Web UI:
I was very much impressed by how the solution worked perfectly well on Windows, the experience using PowerShell and the local Docker Desktop was identical to the one I experienced running on Ubuntu. I’m sure this is good news for a lot of people using Windows as their primary OS.
Final thoughts
Waypoint definitely focuses on developer side simplicity, and hides a lot of the complexity of a usual workflow by providing a relatively opinionated way of doing things across a healthy set of deployment targets.
The solution is clearly not production ready and there is still a big gap in it reaching that state. Security, the difficulties in uninstalling the full solutions as well as releases deployed with it and authorization are likely the first items in the list to require resolution before this can start moving closer to mission critical environments.
Nevertheless, I was pleasantly surprised on the simplicity in getting everything running and the example applications deployed, and will definitely track this going forward as I’m sure it has a lot of potential.
Another pleasant surprise is that, for being such an early project, the documentation is quite solid.
Get notified of new experiments and articles on cloud native technologies, join my mailing list!.